Image view and sampler
Code: main.rs
In this chapter we're going to create two more resources that are needed for the graphics pipeline to sample an image. The first resource is one that we've already seen before while working with the swapchain images, but the second one is new - it relates to how the shader will read texels from the image.
Texture image view
We've seen before, with the swapchain images and the framebuffer, that images are accessed through image views rather than directly. We will also need to create such an image view for the texture image.
Add an AppData field to hold a vk::ImageView for the texture image and create a new function create_texture_image_view where we'll create it:
impl App {
    unsafe fn create(window: &Window) -> Result<Self> {
        // ...
        create_texture_image(&instance, &device, &mut data)?;
        create_texture_image_view(&device, &mut data)?;
        // ...
    }
}

struct AppData {
    // ...
    texture_image: vk::Image,
    texture_image_memory: vk::DeviceMemory,
    texture_image_view: vk::ImageView,
    // ...
}

unsafe fn create_texture_image_view(device: &Device, data: &mut AppData) -> Result<()> {
    Ok(())
}
The code for this function can be based directly on create_swapchain_image_views. The only two changes you have to make are the format and the image:
let subresource_range = vk::ImageSubresourceRange::builder()
    .aspect_mask(vk::ImageAspectFlags::COLOR)
    .base_mip_level(0)
    .level_count(1)
    .base_array_layer(0)
    .layer_count(1);

let info = vk::ImageViewCreateInfo::builder()
    .image(data.texture_image)
    .view_type(vk::ImageViewType::_2D)
    .format(vk::Format::R8G8B8A8_SRGB)
    .subresource_range(subresource_range);
I've left out the explicit components initialization, because vk::ComponentSwizzle::IDENTITY is defined as 0 anyway. Finish creating the image view by calling create_image_view:
data.texture_image_view = device.create_image_view(&info, None)?;
Because so much of the logic is duplicated from create_swapchain_image_views, you may wish to abstract it into a new create_image_view function:
unsafe fn create_image_view(
    device: &Device,
    image: vk::Image,
    format: vk::Format,
) -> Result<vk::ImageView> {
    let subresource_range = vk::ImageSubresourceRange::builder()
        .aspect_mask(vk::ImageAspectFlags::COLOR)
        .base_mip_level(0)
        .level_count(1)
        .base_array_layer(0)
        .layer_count(1);

    let info = vk::ImageViewCreateInfo::builder()
        .image(image)
        .view_type(vk::ImageViewType::_2D)
        .format(format)
        .subresource_range(subresource_range);

    Ok(device.create_image_view(&info, None)?)
}
The create_texture_image_view function can now be simplified to:
unsafe fn create_texture_image_view(device: &Device, data: &mut AppData) -> Result<()> {
    data.texture_image_view = create_image_view(
        device,
        data.texture_image,
        vk::Format::R8G8B8A8_SRGB,
    )?;

    Ok(())
}
And create_swapchain_image_views can be simplified to:
unsafe fn create_swapchain_image_views(device: &Device, data: &mut AppData) -> Result<()> {
    data.swapchain_image_views = data
        .swapchain_images
        .iter()
        .map(|i| create_image_view(device, *i, data.swapchain_format))
        .collect::<Result<Vec<_>, _>>()?;

    Ok(())
}
Make sure to destroy the image view at the end of the program, right before destroying the image itself:
unsafe fn destroy(&mut self) {
    self.destroy_swapchain();
    self.device.destroy_image_view(self.data.texture_image_view, None);
    // ...
}
Samplers
It is possible for shaders to read texels directly from images, but that is not very common when they are used as textures. Textures are usually accessed through samplers, which will apply filtering and transformations to compute the final color that is retrieved.
These filters are helpful to deal with problems like oversampling. Consider a texture that is mapped to geometry with more fragments than texels. If you simply took the closest texel for the texture coordinate in each fragment, then you would get a result like the first image:
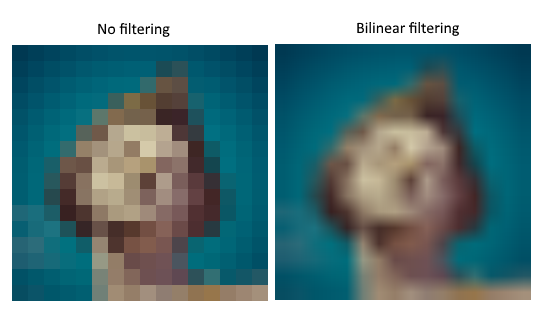
If you combined the 4 closest texels through linear interpolation, then you would get a smoother result like the one on the right. Of course your application may have art style requirements that fit the left style more (think Minecraft), but the right is preferred in conventional graphics applications. A sampler object automatically applies this filtering for you when reading a color from the texture.
Undersampling is the opposite problem, where you have more texels than fragments. This will lead to artifacts when sampling high frequency patterns like a checkerboard texture at a sharp angle:
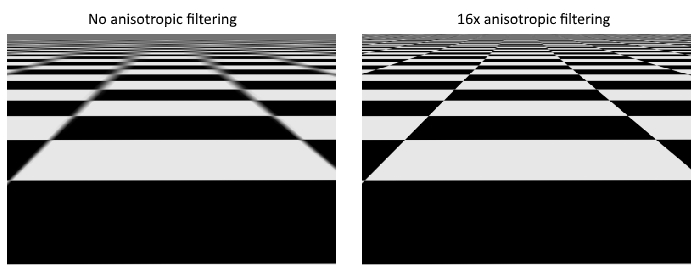
As shown in the left image, the texture turns into a blurry mess in the distance. The solution to this is anisotropic filtering, which can also be applied automatically by a sampler.
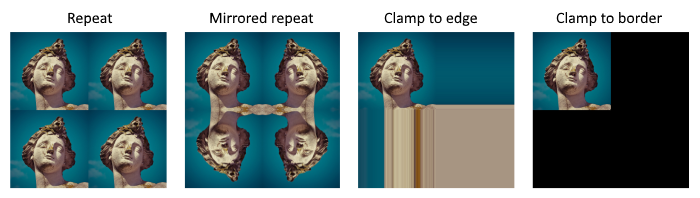
Aside from these filters, a sampler can also take care of transformations. It determines what happens when you try to read texels outside the image through its addressing mode. The image below displays some of the possibilities:
We will now create a function create_texture_sampler to set up such a sampler object. We'll be using that sampler to read colors from the texture in the shader later on.
impl App {
    unsafe fn create(window: &Window) -> Result<Self> {
        // ...
        create_texture_image(&instance, &device, &mut data)?;
        create_texture_image_view(&device, &mut data)?;
        create_texture_sampler(&device, &mut data)?;
        // ...
    }
}

unsafe fn create_texture_sampler(device: &Device, data: &mut AppData) -> Result<()> {
    Ok(())
}
Samplers are configured through a vk::SamplerCreateInfo structure, which specifies all filters and transformations that it should apply.
let info = vk::SamplerCreateInfo::builder()
    .mag_filter(vk::Filter::LINEAR)
    .min_filter(vk::Filter::LINEAR)
    // continued...
The mag_filter and min_filter fields specify how to interpolate texels that are magnified or minified. Magnification concerns the oversampling problem describes above, and minification concerns undersampling. The choices are vk::Filter::NEAREST and vk::Filter::LINEAR, corresponding to the modes demonstrated in the images above.
    .address_mode_u(vk::SamplerAddressMode::REPEAT)
    .address_mode_v(vk::SamplerAddressMode::REPEAT)
    .address_mode_w(vk::SamplerAddressMode::REPEAT)
The addressing mode can be specified per axis using the address_mode fields. The available values are listed below. Most of these are demonstrated in the image above. Note that the axes are called U, V and W instead of X, Y and Z. This is a convention for texture space coordinates.
vk::SamplerAddressMode::REPEAT– Repeat the texture when going beyond the image dimensions.vk::SamplerAddressMode::MIRRORED_REPEAT– Like repeat, but inverts the coordinates to mirror the image when going beyond the dimensions.vk::SamplerAddressMode::CLAMP_TO_EDGE– Take the color of the edge closest to the coordinate beyond the image dimensions.vk::SamplerAddressMode::MIRROR_CLAMP_TO_EDGE– Like clamp to edge, but instead uses the edge opposite to the closest edge.vk::SamplerAddressMode::CLAMP_TO_BORDER– Return a solid color when sampling beyond the dimensions of the image.
It doesn't really matter which addressing mode we use here, because we're not going to sample outside of the image in this tutorial. However, the repeat mode is probably the most common mode, because it can be used to tile textures like floors and walls.
    .anisotropy_enable(true)
    .max_anisotropy(16.0)
These two fields specify if anisotropic filtering should be used. There is no reason not to use this unless performance is a concern. The max_anisotropy field limits the amount of texel samples that can be used to calculate the final color. A lower value results in better performance, but lower quality results. There is no graphics hardware available today that will use more than 16 samples, because the difference is negligible beyond that point.
.border_color(vk::BorderColor::INT_OPAQUE_BLACK)
The border_color field specifies which color is returned when sampling beyond the image with clamp to border addressing mode. It is possible to return black, white or transparent in either float or int formats. You cannot specify an arbitrary color.
.unnormalized_coordinates(false)
The unnormalized_coordinates field specifies which coordinate system you want to use to address texels in an image. If this field is true, then you can simply use coordinates within the [0, width) and [0, height) range. If it is false, then the texels are addressed using the [0, 1) range on all axes. Real-world applications almost always use normalized coordinates, because then it's possible to use textures of varying resolutions with the exact same coordinates.
    .compare_enable(false)
    .compare_op(vk::CompareOp::ALWAYS)
If a comparison function is enabled, then texels will first be compared to a value, and the result of that comparison is used in filtering operations. This is mainly used for percentage-closer filtering on shadow maps. We'll look at this in a future chapter.
    .mipmap_mode(vk::SamplerMipmapMode::LINEAR)
    .mip_lod_bias(0.0)
    .min_lod(0.0)
    .max_lod(0.0);
All of these fields apply to mipmapping. We will look at mipmapping in a later chapter, but basically it's another type of filter that can be applied.
The functioning of the sampler is now fully defined. Add an AppData field to hold the handle of the sampler object:
struct AppData {
    // ...
    texture_image_view: vk::ImageView,
    texture_sampler: vk::Sampler,
    // ...
}
Then create the sampler with create_sampler:
data.texture_sampler = device.create_sampler(&info, None)?;
Note the sampler does not reference a vk::Image anywhere. The sampler is a distinct object that provides an interface to extract colors from a texture. It can be applied to any image you want, whether it is 1D, 2D or 3D. This is different from many older APIs, which combined texture images and filtering into a single state.
Destroy the sampler at the end of the program when we'll no longer be accessing the image:
unsafe fn destroy(&mut self) {
    self.destroy_swapchain();
    self.device.destroy_sampler(self.data.texture_sampler, None);
    // ...
}
Anisotropy device feature
If you run your program right now, you'll see a validation layer message like this:

That's because anisotropic filtering is actually an optional device feature. We need to update the create_logical_device function to request it:
let features = vk::PhysicalDeviceFeatures::builder()
    .sampler_anisotropy(true);
And even though it is very unlikely that a modern graphics card will not support it, we should update check_physical_device to check if it is available:
unsafe fn check_physical_device(
    instance: &Instance,
    data: &AppData,
    physical_device: vk::PhysicalDevice,
) -> Result<()> {
    // ...

    let features = instance.get_physical_device_features(physical_device);
    if features.sampler_anisotropy != vk::TRUE {
        return Err(anyhow!(SuitabilityError("No sampler anisotropy.")));
    }

    Ok(())
}
The get_physical_device_features repurposes the vk::PhysicalDeviceFeatures struct to indicate which features are supported rather than requested by setting the boolean values.
Instead of enforcing the availability of anisotropic filtering, it's also possible to simply not use it by conditionally setting:
    .anisotropy_enable(false)
    .max_anisotropy(1.0)
In the next chapter we will expose the image and sampler objects to the shaders to draw the texture onto the square.